How To Save A Live Photo As A Video? Easy Methods
Three seconds of video are recorded by live photos, with one and a half seconds being captured before and after the shutter clicks. Simply hold down the live photo button to see the entire sequence. In reality, this is a High-Efficiency Image File (HEIF) format, despite what you might think since it looks like a video. Live Photos, however, would only function on iPhones. When you share them with your friends, they become static images. Definitely a significant disadvantage!
The release of iOS13 has thankfully made it possible to convert Live Photos to video. With the addition of sound and motion, you can make short videos from your Live Photos. Additionally, there are no limitations on where you can share the videos. In order to share a Live Photo more conveniently, this article explains how to save it as a video.
How Do You Save A Live Photo As A Video On iPhone?
Apple’s Live Photos feature combines a still image with a brief video before and after, but it is ineffective outside of Apple’s apps. You can save a Live Photo as a video by following these steps. Both iPads and iPhones can be used with this technique.
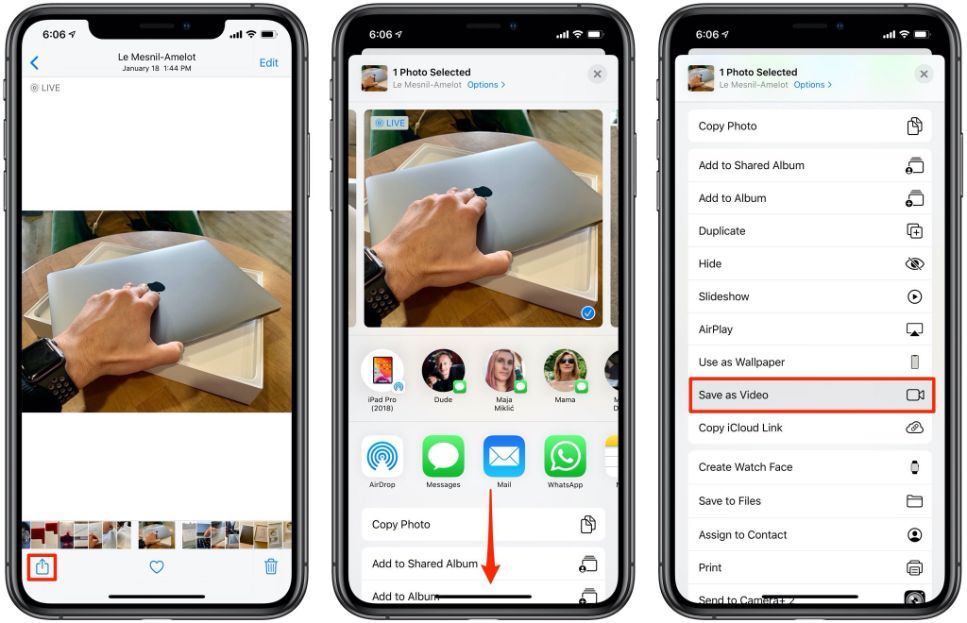
- In the Photos app, open the Live Photo you want to save as a video and tap the share button.
- Select Save as Video from the list of options. Instantaneously, the Live Photo will be saved as a video.
The Photos view, which is what opens up by default when you open the Photos app, doesn’t always show the new video. You may need to navigate to Albums, then Recents, to find the video file.
How Do You Save A Live Photo As A Video Using A Shortcut?
With the help of this technique, you can configure a shortcut on your iPhone or iPad to save Live Photos as videos. This is helpful if you frequently take live photos or want to quickly save a lot of them as videos.
- Open Shortcuts and select the + icon in the upper right to create a new shortcut.
- Select Add Action.
- Search for Live Photos in the field that appears, then select Get Latest Live Photos.
- Select Choose from List. It will automatically include the Latest Live Photos variable.
- Use the search bar at the bottom of the Shortcut creation screen to search for Encode Media. To add it to the shortcut, simply tap.
- Use the search bar again to search for Save to Photo Album. To include it in the shortcut, tap.
- To save the shortcut, close the Shortcut creation screen.
Once created, you can add this shortcut to your home screen using the Shortcut widget that is included with iOS. As a result, it is simple to locate and save a recent Live Photo as a video.
A number of changes can be made to this shortcut. It can be altered, for instance, to save multiple videos simultaneously or you can send the video directly to a social media app rather than saving it to a photo album.
How Do You Edit Live Photos?
iPhone lets you edit your Live Photos to add excitement to them. Filters, frame trimming, and changes to color and contrast are all options. We are going to teach you exactly how to edit your Live Photos below-
- Select the Live Photo you want to edit in the Photos app. Tap on the “Edit” option on top of the image.
- Now, you can give your Live Photo a variety of effects. iPhone lets you choose any key image to put at the beginning of your Live Photos.
- The slider can be used to crop the frames in your Live photos as well. Here, you can also turn off the audio by tapping on the “Volume” button on top of the interface.
- You can also edit your Live Photos to tactic images by pressing the “Live Photos” button. Additionally, you may edit the exposure, color, and contrast by using the “Enhance” option.
- Additionally, you can add various filters and crop your Live Photos. Tap on “Done” to save your edits.
In addition to the aforementioned, you can use custom settings for your images. All edited photos are saved in your Photos app for sharing and viewing.
How Can You Turn Live Photos Into Still Pictures?
In order to conserve space, you might want to switch Live Photos to static images. Additionally, because of their smaller size, the process makes it simpler to share your photos. Any Live Photo on your iPhone can be changed in two easy steps. Find them below-
- Select the Live Photo you want to convert by opening the Photos app. Next, tap on “Edit” at the top right part of your screen.
- To convert your photo to a static image, tap on the blue Live Photo icon. Press “Done” to save you static image created by Live Photo.


